sexta-feira, 24 de fevereiro de 2012
Subtitle Editor for Linux - Editor de Legendas para Linux
Subtitle Editor is free software released under the GNU General Public License (GPL3).
Instructions to install and download it by:
http://home.gna.org/subtitleeditor/
Subtitile Editor é uma ferramenta baseada em GTK+2 para editar/criar legendas em ambiente GNU/Linux/*BSD. Pode ser utilizado para legendas novas ou como ferramenta para mudar, editar, corrigir e refinar/revisar legendas existentes. Este programa também mostra ondas sonoras, com o qual facilmente são sincronizadas legendas e voz.
Subtitile Editor é um software livre lançado sob GNU Licença Pública Geral (GPL3) e sua utilização/modificação de forma comercial deve atender aos requisitos dessa licença.
Tantos as instruções para instalação como o programa para baixar encontra-se em:
http://home.gna.org/subtitleeditor/
terça-feira, 20 de dezembro de 2011
openSUSE on a flashdrive / openSUSE no pendrive - 2
http://www.pendrivelinux.com/usb-suse-flash-drive-install/
This tutorial covers the process of creating a SUSE Linux USB Flash Drive using the OpenSUSE Live CD. This tutorial works much like the install to an External USB Hard drive with the exception that the user is performing a full OpenSUSE install to a USB flash drive. The process does differ slightly! This tutorial was made possible due to a custom Portable SUSE script created and provided by James Rhodes. Please note that due to the limited number of write functions a flash drive can handle before going bad, you may reduce the life of your flash drive by performing this installation.
Screenshot of OpenSUSE running Portably from flash:
USB SUSE install Requirements:
- 4GB+ USB flash drive (Highly recommend the OCZ Rally 2 Turbo)
- OpenSUSE Live CD
- Portable SUSE conversion script
Warning: Before proceeding, backup all data you wish to save from your flashdrive. In addition, physically disconnect any internally attached hard drives to avoid the possibility of installing to the wrong device. If your flash drive contains a fat filesystem it will be shrunk and new partitions will be added for the SUSE OS (so you will still have a Windows accessible partition).
- Download the Live CD KDE (685MB) ISO, burn to a CD and start your system from the CD
- Once SUSE is up and running, insert your USB flashdrive
- When prompted that a new medium has been detected, select the option to Do Nothing and check the box to Always do this for this type of media then click OK
- Next, click the My Computer icon from your SUSE desktop
- Locate your USB device from the Disk Information section on the page
- Right click on the device and select Properties
- From the Properties window that appear, click the Mounting tab
- Uncheck the Mount automatically box and click OK
- From the Disk Information section, right click on the device again and select to Safely Remove
- * Now unplug and reinsert your flash drive.
- You may be prompted again that a new medium has been detected, select the option to Do Nothing and check the box to Always do this for this type of media then click OK
- Next, start the installer via the install icon on your desktop and proceed to follow the onscreen instructions. Once you get to the Live Installation Settings page, click Partitioning
- Next, from the Suggested Partitioning page, select the option to Base Partition Setup on This Proposal and click Next
- Now from the Expert Partitioner page, select your Fat Partition and click Resize
- From the resize pop up window that appears, reduce the size of your windows partition to around 200MB or less
- In the pop up that appears click Yes to allow the Linux partiton to use the new empty space
- Next, Accept and continue the install. Once the installer has finished, reboot your computer. Remove the CD from the drive and proceed to boot from the USB device
- Continue the onscreen setup process… users and passwords etc. * Skip the Online Update Configuration step. (Select Configure Later)
- Once your up and running again, press alt+f2 and type konsolesu then press Enter
- Type wget pendrivelinux.com/downloads/portablesuse.tar.gz
- Type tar -zxvf *.tar.gz
- Type ./installation and follow the onscreen instructions answering y to all of the questions
- Type reboot to reboot and ensure that everything is still working
See other ways on:
http://en.opensuse.org/SDB:Live_USB_stick#Get_isohybrid
segunda-feira, 19 de dezembro de 2011
openSUSE no pendrive - 1 - Bootable USB from DVD or Net-install
Bootable USB from DVD or Net-install
by:
http://en.opensuse.org/SDB:Live_USB_stick#Create_a_Live_USB_.28GUI.29
[edit] Download DVD ISO
Download one of the DVD or Net Installation images from http://software.opensuse.org/Linux instructions1. Install syslinux/isohybridIf you would like to boot the from a USB stick then you can make the ISO bootable by installing syslinux.# zypper in syslinux # isohybrid openSUSE-12.1-DVD-x86_64.isoOnce completed just follow whichever set of above LiveUSB instructions you like, and take care to read the Booting from USB-DVD section below afterward, like the instructions below. |
2. Find Block Device
Plug-in your USB stick and find what "/dev/disk*" it is mapped to by opening Terminal and executing:# diskutil list
This will print out the list of currently mapped devices/partitions. Find the USB using "NAME" column. Then note the corresponding /dev/disk*. For example:
/dev/disk2 #: TYPE NAME SIZE IDENTIFIER 0: FAT32 2.0 GB disk0 1: USB2 2.0 GB disk0s1In this case /dev/disk2 is the one we want.
Or:
Plug-in your USB stick and find it executing:
# fdisk -l
You can see the results:
Disk /dev/sda: 250.1 GB, 250059350016 bytes
255 heads, 63 sectors/track, 30401 cylinders, total 488397168 sectors
Units = sectors of 1 * 512 = 512 bytes
Sector size (logical/physical): 512 bytes / 512 bytes
I/O size (minimum/optimal): 512 bytes / 512 bytes
Disk identifier: 0x271ebf44
Device Boot Start End Blocks Id System
/dev/sda1 2048 3074047 1536000 27 Hidden NTFS WinRE
/dev/sda2 * 3074048 488396799 242661376 7 HPFS/NTFS/exFAT
Disk /dev/sdb: 16.0 GB, 16022241280 bytes
82 heads, 18 sectors/track, 21201 cylinders, total 31293440 sectors
Units = sectors of 1 * 512 = 512 bytes
Sector size (logical/physical): 512 bytes / 512 bytes
I/O size (minimum/optimal): 512 bytes / 512 bytes
Disk identifier: 0xc3072e18
Device Boot Start End Blocks Id System
/dev/sdb1 * 8064 31293439 15642688 c W95 FAT32 (LBA)
where your 16 GB flash device, in this case, is /dev/sdb1
3. Unmount USB Stick
Unmount the USB stick# diskutil unmountDisk /dev/disk*Where /dev/disk* is the one you have found in previous step.
4. Write ISO to USB
Write the content of the ISO file:# sudo dd if=/path/to/downloaded.iso of=/dev/disk* bs=1MAgain the /dev/disk* is the same one you have found previously. You will be prompted for the administrator's password.
5. Booting from USB-DVD
Write the image to the USB stick using the Windows instructions above.- Hit F4, change the installation source to Hard Drive, but leave all fields blank and hit Enter to close the dialog.
- Type "namescheme=by-label" into the boot options for "Installation" and start the installation; you should go straight to the installer without a hitch.
openSUSE USB Install
by:
http://www.confignotes.com/2011/03/opensuse-usb-install/Installing openSUSE 11.4 using a USB drive.
Download the openSUSE-11.4-DVD-x86_64.iso file for 64bit x86 system. I used another Linux system to prepare the USB drive, you can also boot from a Linux live DVD. Need at least an 8GB USB drive, openSUSE 11.4 iso is 4.3GB.
1. Erase USB drive using dd:
Use dmesg to identify the USB drive device (example: sdb). Or (a better option):
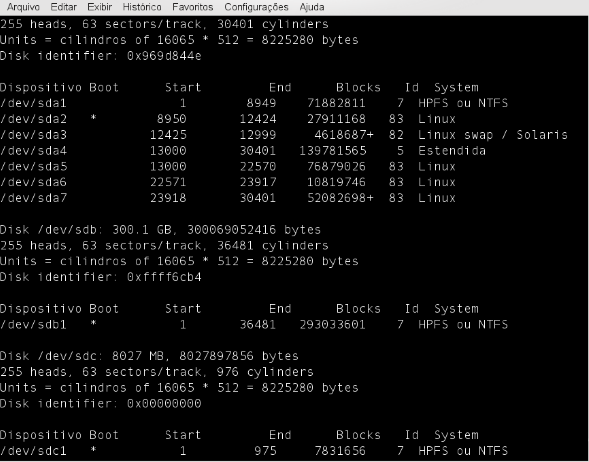
Para saber qual é essa identificação, com o pendrive conectado no computador, digite no terminal o comando:
# fdisk -l
O resultado aparecerá na janela do terminal. Veja a imagem abaixo que mostra o resultado do comando fdisk e na outra imagem o resultado do comando dd. O pendrive, nesse caso, é o ultimo da lista, sendo o dispositivo /dev/sdc1.
O comando, neste exemplo, ficaria assim:
# dd if=openSUSE-11.2-KDE4-LiveCD-i686.iso of=/dev/sdc bs=4M
# dd if=/dev/zero of=/dev/sdb bs=65536 count=10000
2. Use zypper to update the syslinux:
# zypper in syslinux
3. Run isohybrid, isohybrid is availabe with the updated syslinux:
# isohybrid /path…/openSUSE-11.4-DVD-x86_64.iso
where path… is the directory location of the openSUSE iso.
4. Write the content of the iso file to the USB drive:
# dd if=/path…/openSUSE-11.4-DVD-x86_64.iso of=/dev/sdb bs=1M
Boot from the USB flash drive to install openSUSE 11.4
Note: You’ll get a warning when you run isohyrid:
Warning: more than 1024 cylinders (4403).
Not all BIOSes will be able to boot this device.
The cylinder=1024. It should be ok to procede if you have a newer system (south bridge that support SATA). The section of isohybrid perl scripts that displayed the error looks like this:
$c = int($imgsize/$cylsize);
if ($c > 1024) {
print STDERR “Warning: more than 1024 cylinders ($c).\n”;
print STDERR “Not all BIOSes will be able to boot this device.\n”;
$cc = 1024;
} else {
$cc = $c;
}
sábado, 9 de abril de 2011
ATI Driver and Catalyst tool on OpenSuse 11.3 64 bits (x86_64)
see http://en.opensuse.org/SDB:AMD_fglrx#Supported_Hardware
Preconditions:
1. Fresh standard install of openSuSE x86_64, with KDE Graphical Desktop Environment.
2. You have already verified that your graphics card is supported by ATI's Catalyst drivers.
Prep Stage
1. Determine your installed kernel flavor.
Issue this command from the terminal: 'uname -r'
Output is something like: 2.6.x.y-pae or 2.6.x.y-smp or 2.6.x.y-desktop depending on your system. Let's call this your kernel flavor. You will need this info when you get to Step 3 below.
Note the default video drivers loaded/used by KDE.
Click on "My Computer" on the default plasma folder. Note the details provided in the 'Display Info' section, particularly the 2D and 3D drivers currently used by X.
2. Get needed packages.
Make sure the following packages are available: {gcc, make, patch, kernel-devel, kernel-flavor-devel,kernel-source, kernel-syms, module-init-tools, glibc, glib-devel, zlib*, libstdc++, libgcc}
3. Update your openSuSE system to install all NEEDED patches.
You will be asked to reboot, and your kernel will become 2.6.34.7-0.3-flavor or something similar.
4.Get the latest Catalyst Display Driver (Rev 10.9) from ATI's website.
5. Remove any pre-existing fglrx modules running on your system.
Ignore this step if no fglrx modules are running and loaded in your system.
(Command to list existing fglrx modules) rpm -qa | grep -E 'fglrxG01|fglrxG02'
(Command to remove existing fglrx modules) zypper rm 'rpm -qa | grep -E 'fglrxG01|fglrxG02' '
(You can also use YaST to remove the existing fglrx modules if you want, instead of zypper)
Install Stage
6. Go to runlevel 3, log-in and become the superuser. (init 3 / telinit 3)
7. Get Sebastian Siebert's script.
This script will simplify and automate patching of compat_alloc_user_space() which if not done will break the compile process for ATI's Catayst Display Driver with kernel 2.6.34.7-0.3.
This script will also check for needed packages and get them for you automatically. It then runs ATI's installer to automagically set things up for you! (Thanks and credit to Mr. Sebastian Siebert).
wget http://www.sebastian-siebert.de/downloads/makerpm-ati-10.9.sh
8. Get download checksum and verify integrity of downloaded file.
wget http://www.sebastian-siebert.de/downloads/make-rpm-ati-10.9.sh.sha1
sha1sum -c makerpm-ati-10.9.sh.sha1
Screen output should be like: makerpm-ati-10.9.sh: OK
9. Change file ownership and permission of downloaded script file.
chown root:root makerpm-ati-10.9.sh
chmod 744 makrpm-ati-10.9.sh
10. Finally, run the script.
./makerpm-ati-10.9.sh -i
That's it. Reboot your machine and check the display drivers loaded by KDE in 'My Computer'.
Sebastian Siebert offers an optional but highly recommended step to ensure that the system will build the fglrx kernel module before starting the desktop GUI environment in case another kernel update becomes necessary. (./makerpm-ati-10.9.sh -irs)
[Thanks to Google Translate which allowed me to understand Mr. Siebert's instructions in his website]
I hope this information is helpful to someone. Let's hear of your experience.
sábado, 4 de dezembro de 2010
Opensuse 64 bits: Skype 64 bits with video on OpenSUSE 11.3 x86_64
Skype with video on OpenSUSE 11.3 x86_64.
How to install the ubuntu 64 bits skype in OpenSuse.
Steps:
Get the ubuntu 64 bits skype file.
Convert from ubuntu file (.deb) to .rpm
Install skype rpm file.
Instal the dependencies.
Instal a icon on desktop.
Some instructions are found in:
http://en.opensuse.org/SDB:Skype#openSUSE_11.3_and_11.2_quick_installation
http://forums.opensuse.org/english/get-help-here/applications/432193-webcam-skype-2-1-0-81-a.html
Here is a quick run-through how i got it to work.
First get Skype x.x.x.xx here:
http://www.skype.com/intl/pt-br/get-skype/on-your-computer/linux/post-download/
Download and save the 64 bits ubuntu version in ubuntu x.xx + 64 bits. The name the file can be
skype-ubuntu-intrepid_x.x.x.xx-x_amd64.deb
Install the dependencies:
sudo zypper install libqt4-32bit libqt4-x11-32bit
sudo zypper install xorg-x11-libXv
sudo zypper install xorg-x11-libXv-32bit
Note: actually other dependencies can appear. In this case, search the archive where there are the dependencies files in (example for libXv.so.1)
http://rpm.pbone.net/index.php3/stat/3/srodzaj/1/search/libXv.so.1%28%29%2864bit%29
and install the archive with the dependencies.
Get Alien converter (to convert from deb package to rpm package) from:
https://build.opensuse.org/package/binary?arch=x86_64&filename=alien-8.80-1.2.x86_64.rpm&package=alien&project=openSUSE%3A11.3%3AContrib&repository=standard
Install Alien:
First install perl 5.12.1 by yast and and after that, install alien (just click it and let the yas to install it).
to Convert the .deb file into .rpm:
In a terminal console just type:
alien -r -c skype_ubuntu-x.x.x.xx-x_amd64.deb
Install the new converted .rpm package of Skype:
Code:
sudo rpm -ivh skype-x.x.x.xx-x.x86_64.rpm
(or click in archive and permit yast to install)
Install libv4l by yast.
Start Skype in a terminal:
export LD_PRELOAD=/usr/lib/libv4l/v4l1compat.so
skype
To run in a desktop:
Create a skype.sh file:
a. as a root, save a 'skype' paste in directory /opt
b. with a text editor, make a skype.sh file with this commands:
#!/bin/bash
export LD_PRELOAD=/usr/lib/libv4l/v4l1compat.so
skype
c. save in /opt/skype paste named skype.sh and close the editor.
d. click with the right botton on the skype.sh and select 'properties'.
e. in 'Permissions', flag 'Is executable' and click 'ok'.
f. in the desktop, click with the right botton on the skype icon and select 'icon settings'. In 'Application', include:
- 'name': Skype
- 'command': /opt/skype/skype.sh
- 'work path': /opt/skype
Clique 'ok' to save.
Now, if you click the skype icon, skype works with video..
That's it.
Skype 64 bits com video no Opensuse 11.x 64 bits
Skype 64 bits do Ubuntu instalado e com vídeo no OpenSuse 11.3 64 bits
(testado e funcionando!!)
obtido de fórums do OpenSuse em inglês, como o:
http://forums.opensuse.org/english/get-help-here/applications/432193-webcam-skype-2-1-0-81-a.html
e com algumas adaptações.
Primeiro, baixe a última versão do skype para ubuntu x.xx 64 bits em:
http://www.skype.com/intl/pt-br/get-skype/on-your-computer/linux/post-download/
O arquivo baixado vai ser algo parecido como:
skype-ubuntu-intrepid_x.x.x.xx-x_amd64.deb
Instale as dependências (neste caso, foi usado o zypper mas pode ser pelo yast):
sudo zypper install libqt4-32bit libqt4-x11-32bit
sudo zypper install xorg-x11-libXv
sudo zypper install xorg-x11-libXv-32bit
No meu caso, instalei os solicitados pelo site do skype e outros a seguir. Talvez não sejam necessários, mas se alguém souber, por favor retorne:
Qt 4.2.1+
D-Bus 1.0.0
libasound2 1.0.12
PulseAudio 0.9.10+ (opcional)
PulseAudio 0.9.15+ (opcional, recomendado)
ou os mais atuais.
Instalei também o libv4l pelo yast.
Note que outras dependências podem surgir, como libXv.so.1. Nesse caso, obtenha os arquivos para baixá-los em rpm.pbone.net:
http://rpm.pbone.net/index.php3/stat/3/srodzaj/1/search/libXv.so.1%28%29%2864bit%29
e instale o arquivo com as dependências.
Como o skype baixado é para Ubuntu, deve-se convertê-lo para rpm instalável no Opensuse. Para isso, vamos instalar o alien que é um conversor deb->rpm.
instalar o perl 5.12.1 (pelo zypper ou yast)
obter o alien (alien-8.80-1.2.x86_64.rpm) em:
https://build.opensuse.org/package/binary?arch=x86_64&filename=alien
instalar alien clicando sobre o arquivo executável.
Para conversão do skype.deb (ubuntu) para skype.rpm (OpenSuse):
No terminal, vá para o diretório onde se encontra o skype-ubuntu baixado e digite:
alien -r -c skype_ubuntu-x.x.x.xx-x_amd64.deb
que deve gerar um arquivo mais ou menos assim:
skype-x.x.x.xx-x.x86_64.rpm
Instale o arquivo rpm convertido do skype, digitando no terminal:
sudo rpm -ivh skype-x.x.x.xx-x.x86_64.rpm
Para entrar no skype, entre no terminal e digite:
export LD_PRELOAD=/usr/lib/libv4l/v4l1compat.so skype
E o skype rodou em 64 bits, inclusive com vídeo.
Para não precisar digitar no terminal, crie um arquivo executável com extensão .sh, que será executado clicando-se no ícone 'skype' no desktop. Para isso:
a. como superusuário no terminal ou no 'file manager' crie uma pasta 'skype' no diretório /opt
b. com um editor de texto, crie o arquivo skype.sh com as seguintes linhas de comando:
#!/bin/bash
export LD_PRELOAD=/usr/lib/libv4l/v4l1compat.so
skype
c. salve naquela pasta /opt/skype com o nome skype.sh e feche o editor.
d. clique com o botão direito do mouse sobre o arquivo skype.sh e clique em 'properties'.
e. na aba 'Permissions', clique no flag 'Is executable' e clique 'ok'.
f. Clique com o botão direito do mouse sobre o ícone 'skype' do desktop e entre em 'icon settings'. Na aba 'Application', inclua o seguinte:
- em 'name': Skype
- em 'command': /opt/skype/skype.sh
- em 'work path': /opt/skype
Clique 'ok' para salvar.
Ao clicar no ícone, o skype é executado. Com vídeo.
Fim.
.....................................................................................................................
quarta-feira, 6 de outubro de 2010
Getting Catalyst 10.9 to Run on openSuSE11.3 x86_64 (kernel 2.6.34.7-0.3-desktop)
http://www2.ati.com/relnotes/catalyst_linux_installer.pdf
Getting Catalyst 10.9 to Run on openSuSE11.3 x86_64 (kernel 2.6.34.7-0.3-desktop)
http://forums.amd.com/game/messageview.cfm?catid=279&threadid=139992
Getting Catalyst 10.9 to Run on openSuSE11.3 x86_64 (kernel 2.6.34.7-0.3-desktop and newer)
Preconditions:
1. Fresh standard install of openSuSE 11.3 x86_64, with KDE Graphical Desktop Environment.
2. You have already verified that your graphics card is supported by ATI's Catalyst drivers.
Prep Stage
1. Determine your installed kernel flavor.
Issue this command from the terminal: 'uname -r'
Output is something like: 2.6.x.y-pae or 2.6.x.y-smp or 2.6.x.y-desktop depending on your system. Let's call this your kernel flavor. You will need this info when you get to Step 3 below.
Note the default video drivers loaded/used by KDE.
Click on "My Computer" on the default plasma folder. Note the details provided in the 'Display Info' section, particularly the 2D and 3D drivers currently used by X.
2. Get needed packages.
Make sure the following packages are available: {gcc, make, patch, kernel-devel, kernel-flavor-devel,kernel-source, kernel-syms, module-init-tools, glibc, glib-devel, zlib*, libstdc++, libgcc}
3. Update your openSuSE sytem to install all NEEDED patches.
You will be asked to reboot, and your kernel will become 2.6.34.7-0.3-flavor or something similar.
4.Get the latest Catalyst Display Driver (Rev 10.9) from ATI's website.
5. Remove any pre-existing fglrx modules running on your system.
Ignore this step if no fglrx modules are running and loaded in your system.
(Command to list existing fglrx modules) rpm -qa | grep -E 'fglrxG01|fglrxG02'
(Command to remove existing fglrx modules) zypper rm 'rpm -qa | grep -E 'fglrxG01|fglrxG02' '
(You can also use YaST to remove the existing fglrx modules if you want, instead of zypper)
Install Stage
6. Go to runlevel 3, log-in and become the superuser. (init 3 / telinit 3)
7. Get Sebastian Siebert's script.
This script will simplify and automate patching of compat_alloc_user_space() which if not done will break the compile process for ATI's Catayst Display Driver with kernel 2.6.34.7-0.3.
This script will also check for needed packages and get them for you automatically. It then runs ATI's installer to automagically set things up for you! (Thanks and credit to Mr. Sebastian Siebert).
wget http://www.sebastian-siebert.de/downloads/makerpm-ati-10.9.sh
9. Change file ownership and permission of downloaded script file.
chmod 744 makrpm-ati-10.9.sh
Sebastian Siebert offers an optional but highly recommended step to ensure that the system will build the fglrx kernel module before starting the desktop GUI environment in case another kernel update becomes necessary. (./makerpm-ati-10.9.sh -irs)